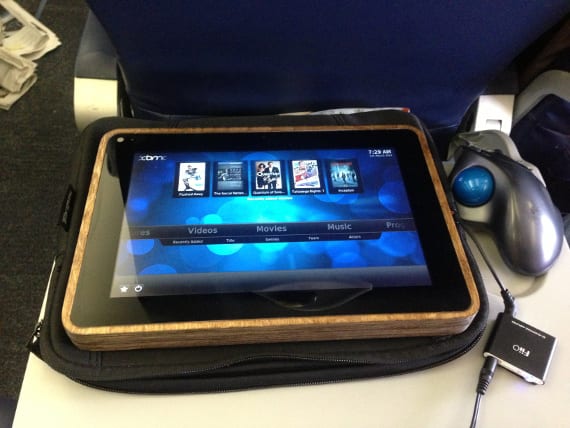
There are a multitude of hacks or small modifications to have our eReader or our tablet to our liking, many of these modifications are small improvements so that the battery lasts longer or solve a technical problem, but there is little information that we find on how to build an eReader or a tablet. PiPad is a project of Michael K Castor whose purpose is to build our own tablet from a Raspberry Pi, a mini computer that is giving a lot of whaté talk. Taking into account the information of Michael K Beaver, we have decided to transcribe the article so that you can build your own PiPad Or what is the same, your own tablet.
List of materials to build PiPad
- Several slats of birch wood (the size will depend on the size of the screen we want to use)
- A carbon fiber plate (the measurements will depend on the size of the screen we use)
- 14 button magnets.
- Anker Astro3E 10000 mAh battery (gives about 6 hours of autonomy)
- Monoprice Wifi Adapter
- IOGear Micro Powered USB Hub
- Terminal Misc. USB - Male A (3), Micro (1), Female A (1)
- 10K Potentiometer.
- Ribbon cable and connectors by GPIO
- Brass hinges
- Audio jack
- Fiio E5 headphone amplifier
- Micro to Mini USB adapter
- 10 ″ capacitive touch screen with LDVS adapter by Chalk - Elec.com
- Raspberry Pi Model B. Here You will find where to get it.
Building the PiPad
The construction of the PiPad is simple and to see very complicated. The process is the same as building a computer case, it is simple. But at the same time, many things must be taken into account, which makes it difficult to build the PiPad. The first thing we do is cut the wooden slats to the size of the screen, as if it were a frame for the screen. We unite it forming a frame and create another like it. Remember that the thickness of the slats must be sufficient to introduce the Raspberry Pi, you have to divide the necessary size by two and that will be the thickness of each strip. Once the two frames have been created, we join them with a clamp and mark the holes that we have to make to insert the connectors.

I include you below CAD models where are they The connectors are marked, but as you can imagine, there will be one for the audio, another for the usb, another to charge the battery and another to turn on the PiPad or tablet. These brands at a minimum. Although there may be many more. Once these marks were made, we began to assemble. On the one hand we glue the carbon fiber plate to one of the frames that we have created. This will be the base on which we will mount the Raspberry Pi and battery. We will use the other frame to assemble the screen to it. Now we have two parts "framed”That we will join by means of the hinges and we will make the closure by placing the magnets on the inside of the frames. Now we only have to connect the cables of the screen with the Raspberry Pi, the battery and the switches with the plate. After the union, we close the tablet and turn on. If we use a RaspbianThere will be no problem and after a few seconds of configuration we will have our PiPad ready.
More information - RockthEink or how to have a home eReader to our liking, Kindleberry Pi, a reader or a minicomputer?, PiPad CAD models
Source and Image - PiPadBuild